HALF DOME
So you’re thinking about hiking Half Dome, but don’t really know how to prepare for this memorable adventure? Well, my friend, you’ve come to the right place. That was me at the beginning of this year. At first, I thought all I needed to do was just show up and perform but upon further investigation, it turned out that there was more planning needed than just showing up and being physically fit. I was a bit overwhelmed with all of the info (or sometimes lack thereof) so I figured I’d throw a guide together to help you guys out! I’ve outlined the hike itself and how to prepare for it, the process of securing a permit (yes, you’ll need a permit to do this), what to pack, & the logistics of getting to Yosemite and staying there.

“The mountains are calling and I must go.”


THE HIKE
First things first, let’s get straight to the stats. This hike ranges from about 17-23 miles depending on the trail that’s taken (not including the walk from the parking lot to the trailhead). There’s a roughly 4800 ft. elevation gain to the top (8,844 ft. elevation) and usually takes anywhere from 10-14 hours to complete. Piece of cake, right!? Riiiiiiight. This hike is not to be taken lightly or underestimated. It is tough but it is definitely worth the struggle to the top. Here’s some info to help you plan you hike of a lifetime:
Where to park:
To get to the trailhead, you’ll first want to park as close as possible so that you don’t add any unnecessary distance. There is a parking lot about a half mile from the trailhead that you can park at for free in Curry Village, but don’t confuse this with the main Curry Village Parking Lot. When we got to the parking lot there was plenty of parking but there were also plenty of hikers that had already started their day. There is also a shuttle service that can drop you off at Happy Isles where you continue on to the trailhead but the shuttle doesn’t start running until 7am and you will want to start your hike before then.
When to start:
The earlier you can start, the better! We woke up at about 4:30am, made a quick breakfast, and left our campsite around 5am to drive to Yosemite Valley which was about 45 minutes from our campground. By the time we found the parking and got all of our stuff together it was around 6am and we started the hike at about 6:30am.
How to get to the trailhead:
The signs are marked pretty clearly but if you feel unsure of where you’re supposed to go just ask someone to point you in the right direction. Being prepared with a map will also help with any confusion. From the parking lot, you will pass Happy Isles and continue on to a clearly marked trailhead. From there you’ll head up and follow the signs.


What trail to take:
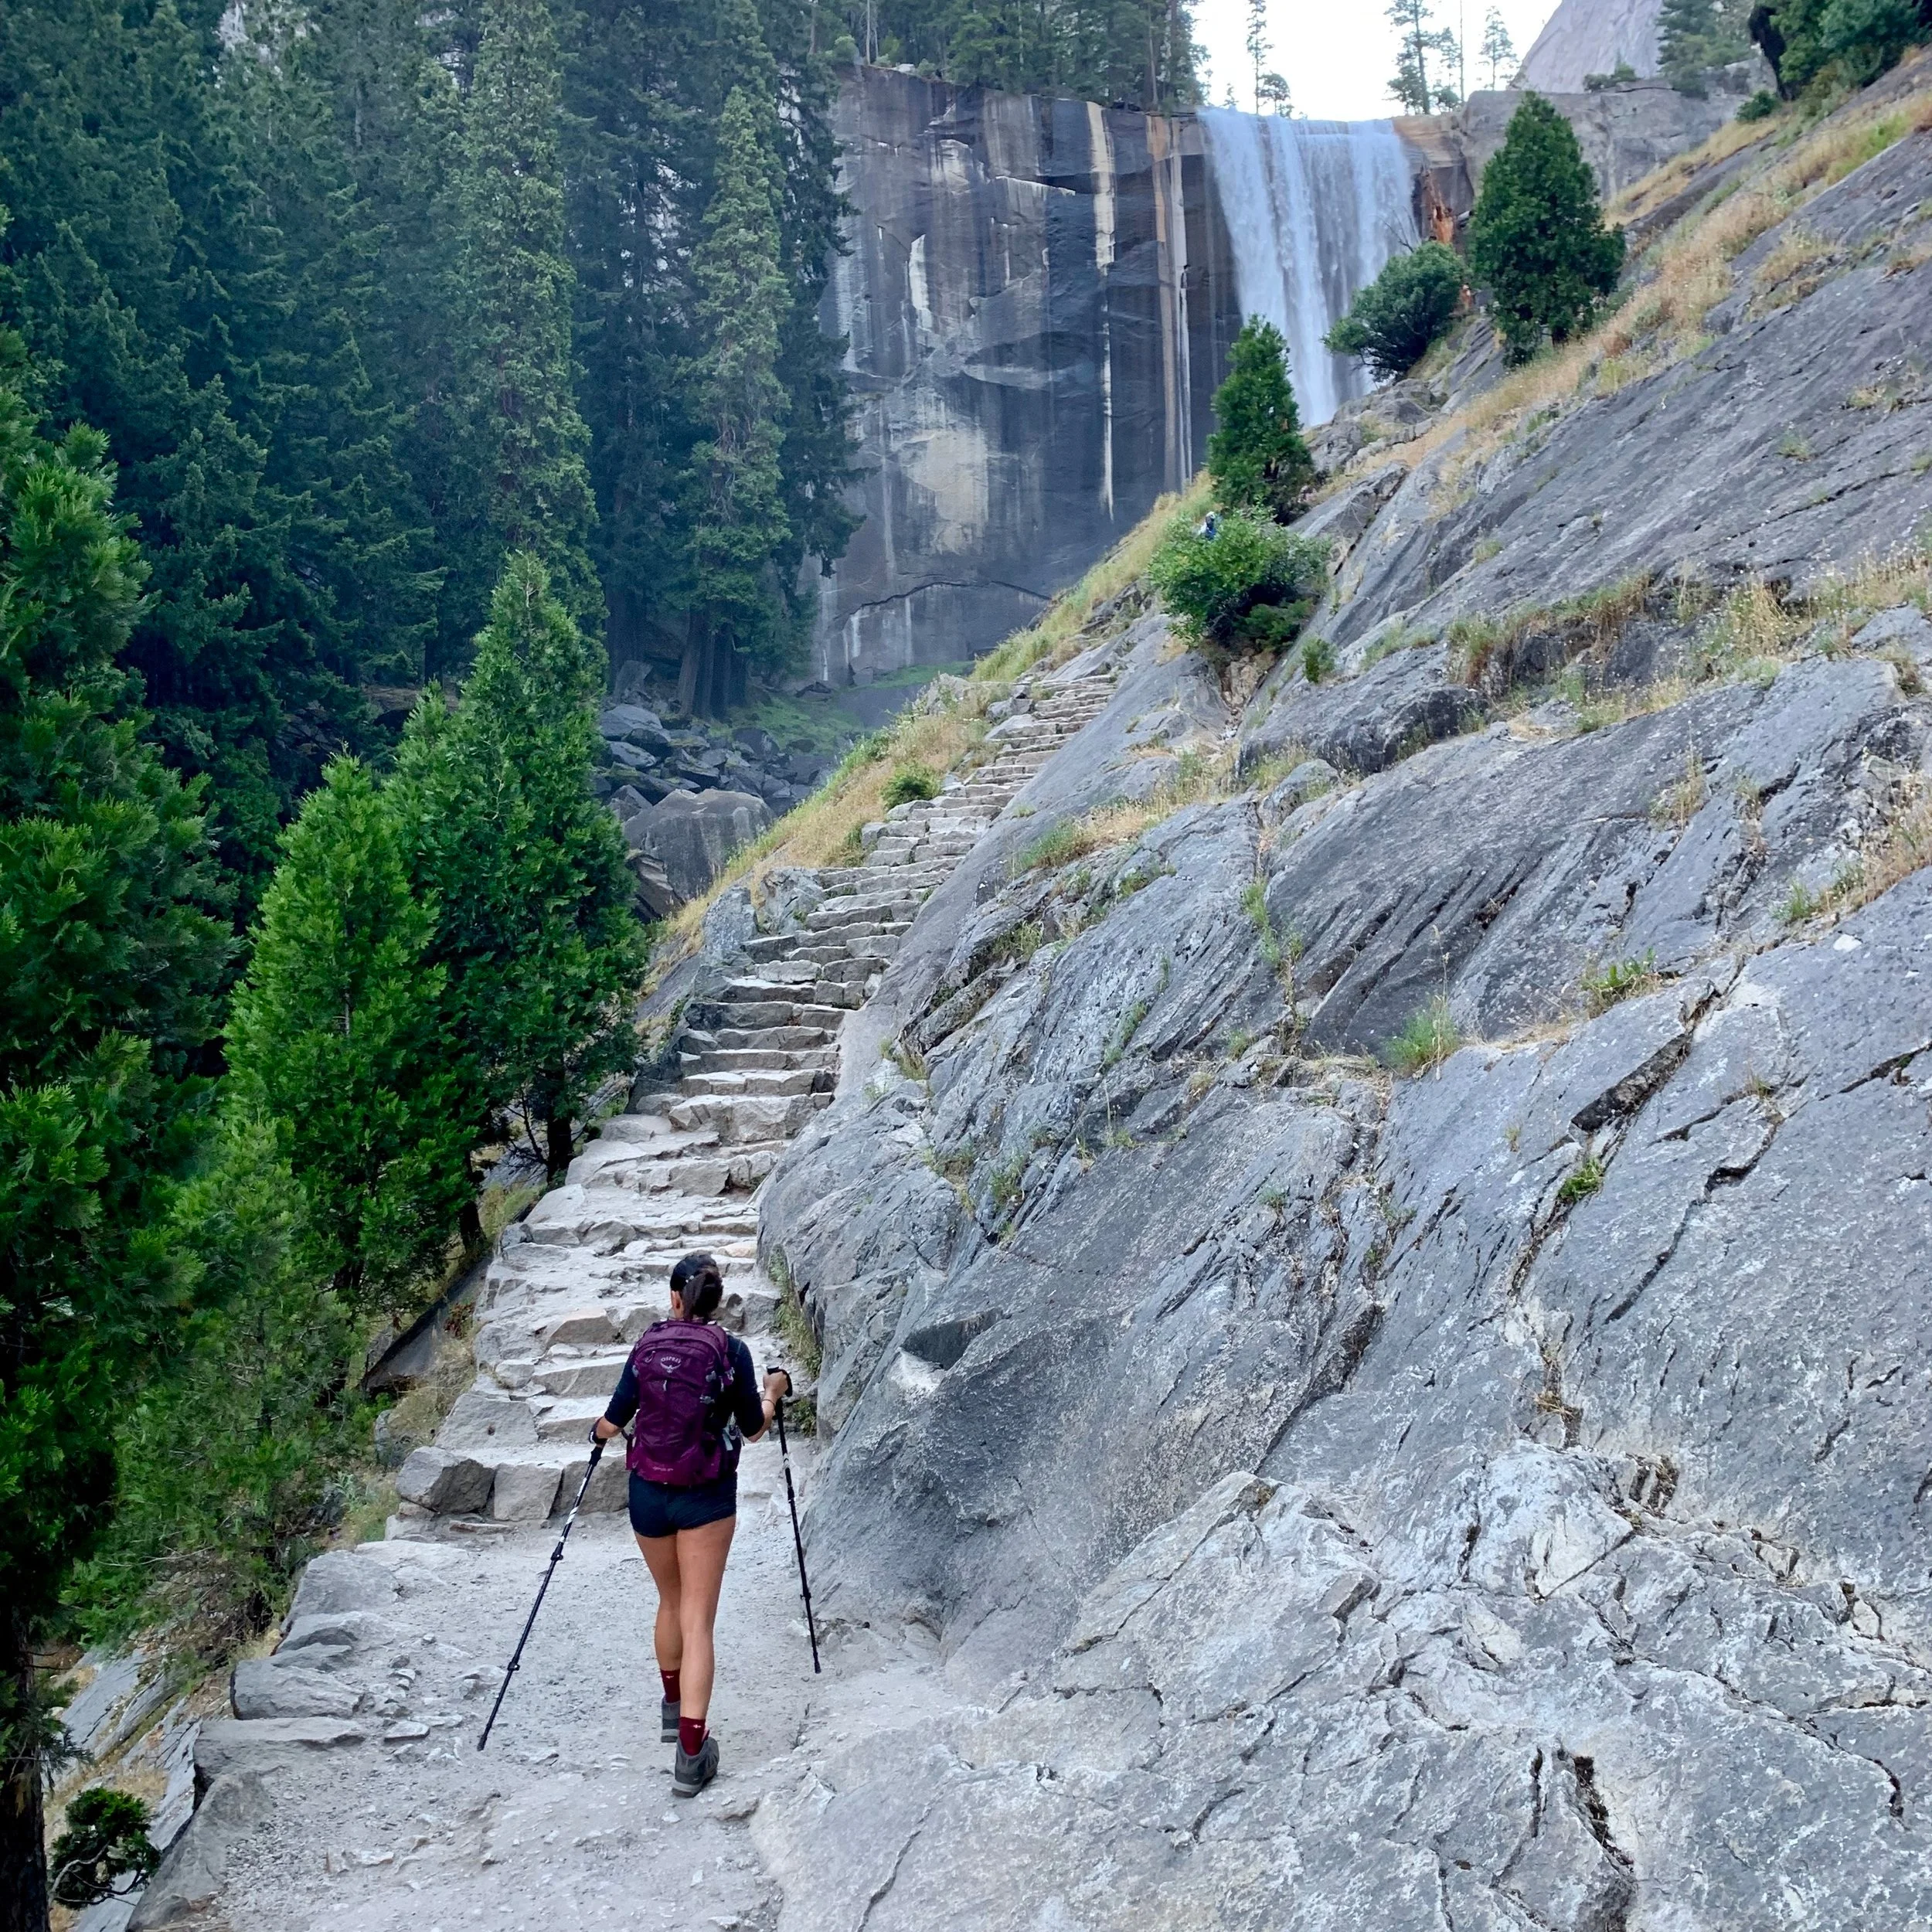
There are several ways to get to Half Dome. If you’re coming from Yosemite Valley (which is what most people do) you can start via the Mist Trail or the John Muir Trail. The trailhead is the same so you don’t need to worry about how to get to each one, you just need to decide which you want to do. The Mist Trail is harder and steeper with lots of stairs, but also shorter and offers breathtaking views of several waterfalls. The John Muir Trail is a more gradual incline but it is about 1.5 miles longer and does not have as much scenery to take in. We decided to take the Mist Trail on the way up and the John Muir Trail on the way down in an attempt to save our knees and avoid the afternoon crowds on the Mist Trail. If we were to do it again, we would probably just take the Mist Trail both ways because that extra 1.5 miles is excruciating when you’ve already been on your feet for 10 hours.
What to expect on the way up:
The way up was tough but not as hard as I had anticipated. I was actually surprised at how well I was doing on the ascent. We stopped once every hour on the way up to eat an energy gel pack (linked in the “What I Packed” section) and to eat an occasional snack. I even commented to the park ranger checking our permits how easy the hike had been up until that point. It wasn’t until we reached the sub-dome area that I realized I had spoke too soon. The sub-dome before the cables was MUCH harder than the cables themselves. It consisted of many stairs and climbing steep rock. This was the first time during the day that I had actually lost my breath. At this point we had already been hiking about 4 hours when we reached the base of the cables around 10:30am. We left our trekking poles and heavier items hidden by some boulders near the cables so we wouldn’t have to carry them up with us and strapped into our harnesses. As soon as we were strapped in, we were ready to go! The cables took about 30 minutes to ascend since there was a bit of traffic (more on that below) so by the time we reached the top it was 11am.

At the top:
The hike prior to reaching the sub-dome had been very shady and cool despite it being a hot day. This is a big part of why starting earlier is better. But by the time we had reached the top, there was absolutely no shade or solace from the beating sun. We ended up spending an hour and a half at the top of the dome just exploring the different vantage points, taking pictures, eating lunch, and soaking it all in. We could have hung out up there all day but we had to remind ourselves that only half the battle had been won. We still had another 4+ hours ahead of us to get back down and we were already pretty wiped out.


What to expect on the way down:
Going down the cables was slightly trickier than going up but I found that turning around and facing the rock while I propelled myself down helped. I’m not gonna lie, the way down was brutal. It was way harder for me than the way up. On the way down, there’s little excitement because you’ve already peaked so you know you just have to keep trudging hour after hour until you get back to your car. The way back also took a little bit longer (5 hours instead of 4.5 hours) because we were tired and took a longer return trail. The last 2 hours of the hike was treacherous. My muscles were totally fine but my feet were screaming with pain. Each step hurt and I couldn’t wait for it to be over. It was almost better to start jogging for some portions of the end to get it over faster. By the time we made it back to the car, it was after 5pm.
The grand finale (showers & food):
It was a really really long day, but it was SO worth it. When we were finished, we went to the showers located in Curry Village since there were none at our campsite. We also had dinner there after so we wouldn’t have to worry about cooking that night. There’s a little outdoor fast-casual restaurant that serves American fare and a market right next to it where you can grab something to eat. After a shower and some food, we were finally ready to head back to camp. This was when I was wishing we had a hotel to return to! Sleeping on the ground in a tent after pushing our bodies to the extreme was not exactly the most comfortable way to end the day, but we still slept like babies anyway.


PHYSICAL
PREPARATION
Hiking Half Dome was one of the most fun, but also one of the most strenuous things I’ve ever done and I’m a pretty active person. I highly recommend it to anyone who’s looking for a challenge and wants to see some pretty spectacular views. It is not for the faint of heart or those that are not in decent physical shape so I would not suggest attempting this hike if you’re not confident in your ability to do so. To prepare myself for this beast of a hike, I did the Stairmaster at the gym about 3 days a week for a couple months leading up to my hike. I also went on a hike almost every week, increasing the distance & difficulty with each one. My boyfriend had to carry the heavier backpack at Half Dome so he trained with a heavy pack so he could get used to hiking long distances with the weight he’d be carrying. Another thing that I did as part of my regular gym routine that really helped with this hike was weight training for my upper and lower body. The lower body training helped condition my legs for the 19 miles that they had to carry me, and the upper body training helped condition my arms for the climbing the cable portion.


GETTING A PERMIT
The first thing you need to know is that a permit is required to complete this hike and can only be obtained 1 of 2 ways: through a pre-season lottery or daily lottery. During the preseason lottery, 225 permits are available for each day and during the daily lottery, about 50 permits. These permits are available based on the estimated rate of under-use and cancellation of permits (the exact number may change through the summer). The daily lotteries have an application period two days prior to the hiking date with a notification late that night.
The application period for this year was March 1-March 31 with results being distributed in mid-April via email but the exact dates are subject to change slightly from year to year so make sure you check this website for updates. My boyfriend and I both applied for permits to increase our chances of getting one, and I was the lucky winner! According to the Half Dome Stats website, the success rate of getting a weekend preseason permit in 2017 was only 2% and as the hike grows in popularity, your chance of scoring a Half Dome permit decreases. When applying for a permit in the pre-season lottery, you can include up to 5 dates or date ranges for your hike. This increases your chances of getting at least one of those dates as opposed to providing just 1 option.
A permit for this hike was not always necessary, but in 2011 the national park service began implementing this safety measure in an effort to regulate the number of hikers using the cable system to the top of Half Dome. Now, there are only about 300 people on the cables per day as opposed to 1000+ so that the cables are not congested with traffic. A ranger will be checking permits and ID’s at the base of the sub-dome so be sure to have both handy. Cell phone service in the park is very limited so I would recommend either taking a screenshot of your permit or printing it out to be safe in case your phone dies.

↑ This is the email I got being notified that I was awarded a permit. This is NOT the permit so make sure you print the permit, not this email.
WHAT I WORE
HI-TEC Gunnison Women's Hiking Boots - These boots are regularly on sale for almost half price at Big 5 and I gotta say they’re pretty comfortable. I was skeptical about these boots since I had been eyeing some much more expensive options and couldn’t believe that these would hold up during a big hike but I’ve worn them for several hikes now and they’ve held up really well. They’re also supposedly waterproof but I haven’t gotten them wet yet so I’m not sure about that.
Athletic Shoe Insoles - Since the boots I got were kind of cheap, I decided to at least invest in some insoles that might provide a little more support. I bought these off Amazon for cheap and they were definitely more comfortable than the ones that came with the boot. The next time I do a really big hike, I might consider getting even better ones because of how much of a difference they made.
Merino Wool Hiking Socks - I got these socks for like $10 off Amazon and let me tell you they literally saved my feet. I did not get 1 blister thanks to this bad boys. I was afraid the wool was going to get pretty hot in the summer sun but these socks were super breathable and wicked away any moisture from my feet so that they didn’t get gross or sweaty.


Tank Top
Sports Bra
Long-Sleeve shirt for the morning when it’s still a bit chilly
Shorts or comfy hiking pants/leggings (I recommend shorts over pants in the heat though)

WHAT I PACKED
Here was my packing list for Half Dome with the products linked:
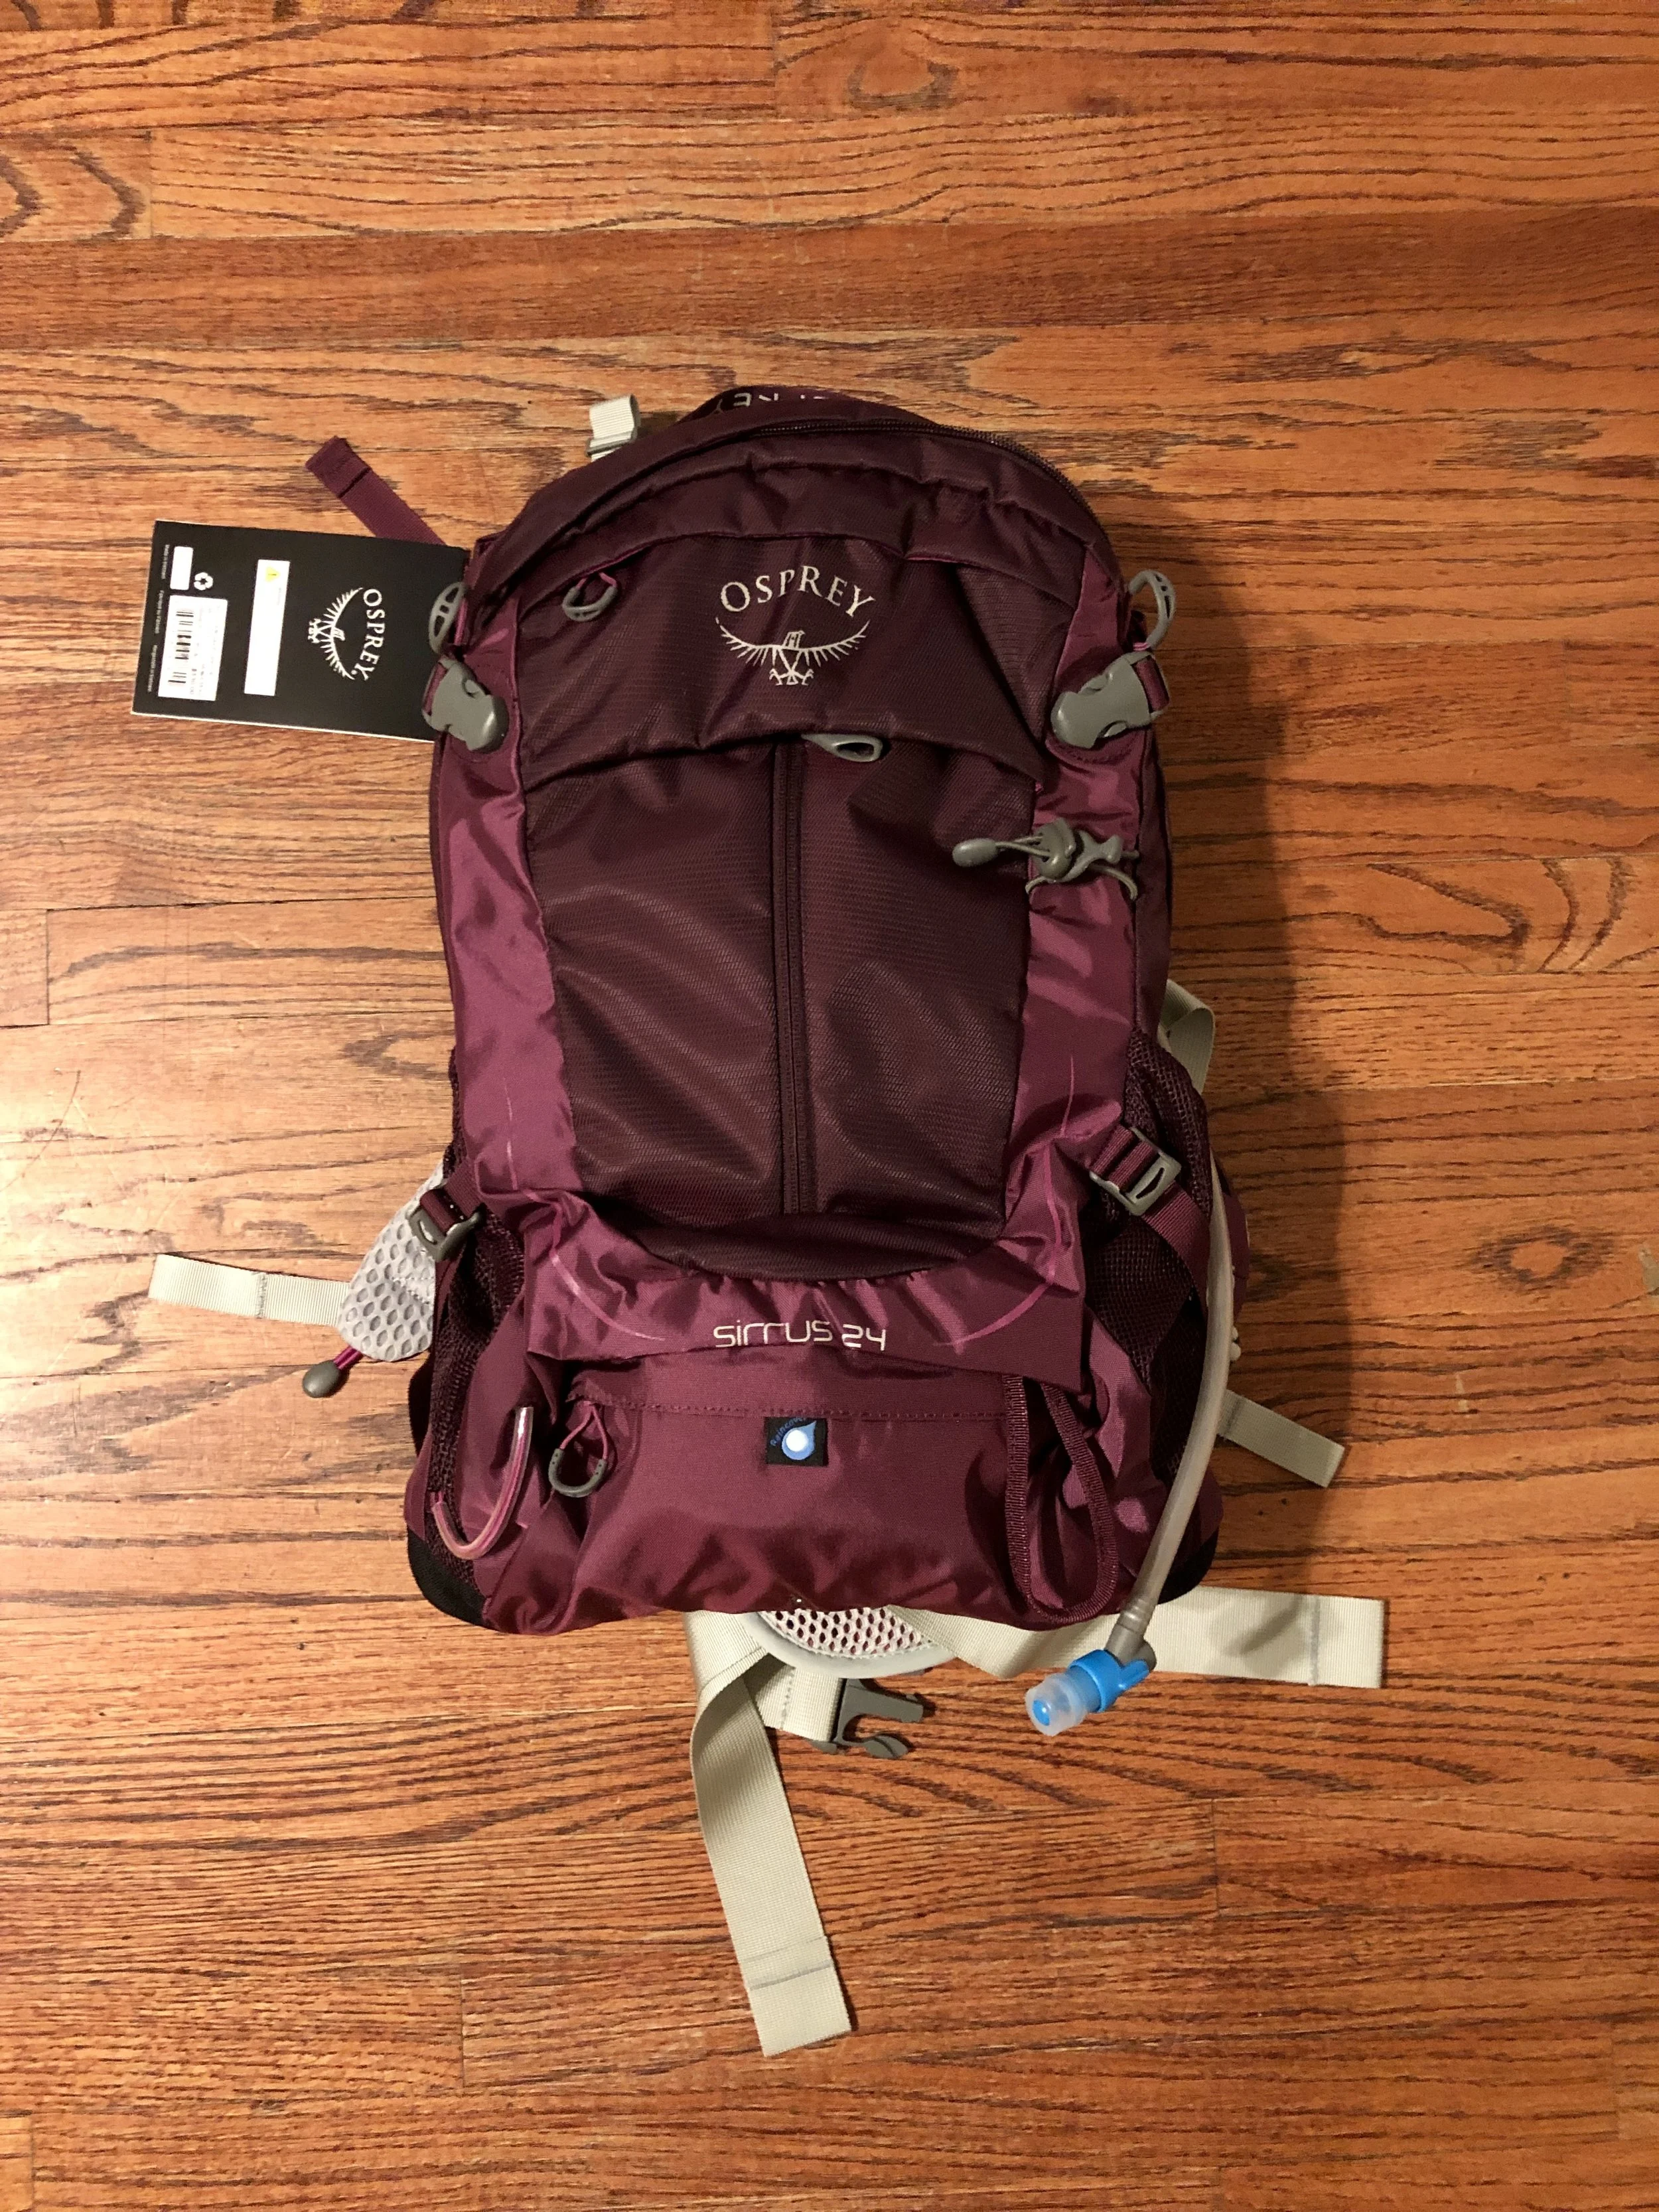
Osprey Women's Sirrus 24 Backpack - I’m not used to hiking with a backpack (because Nick usually carries my stuff for me lol) so I was a little worried that it was going to be uncomfortable but this pack was perfect. The waist and chest straps made it feel super secure and helped distribute the weight evenly so my back didn’t hurt and the suspended mesh back panel lifted the pack slightly off my back to provide air circulation so I didn’t get too hot or sweaty from it. It was also a great size to carry all of my things with room to spare.
HydraPak Shape-Shift Hydration Reservoir (2 Liters) - This hydration pack was a God send on the day of the hike. I normally bring a refillable water bottle so having a hands-free source of hydration was soooo nice and convenient! No more stopping every 20 minutes to drink some water! As an avid hiker, I’m not sure why I didn’t invest in something like this sooner.
TrailBuddy Trekking Poles - I had never hiked with trekking poles before, but I figured I should get them because my knees give me problems going downhill and I didn’t want to be in pain for almost 5 hours it took to descend from the mountain. I am SO glad that I ended up buying these. Not only were they affordable, but they were the true heroes of the day. I thought I’d only use them on the way down but they helped me so much on the way up. I don’t think I’ll hike without poles again.
Gorilla Grip Gloves - These were for climbing the cables. Any gloves with grip should be fine but I really liked how these felt. They were thin but had great traction.


Black Diamond Momentum Harness - Looking back, I probably would not have climbed the cables with a harness. The harness provided me with safety and relieved my anxiety so that I could fully be in the moment and enjoy what I was doing.
2x Black Diamond 18mm Nylon Runners - These are the yellow runners pictured below. I used these plus 3 carabiners & harness to create a via ferrata style harness for the climb up the cables. This essentially allowed me to be clipped onto the cables at all times.
2x C.A.M.P. USA Photon Wire Straight Gate Carabiners - I used these to clip onto the cables, 1 at a time.
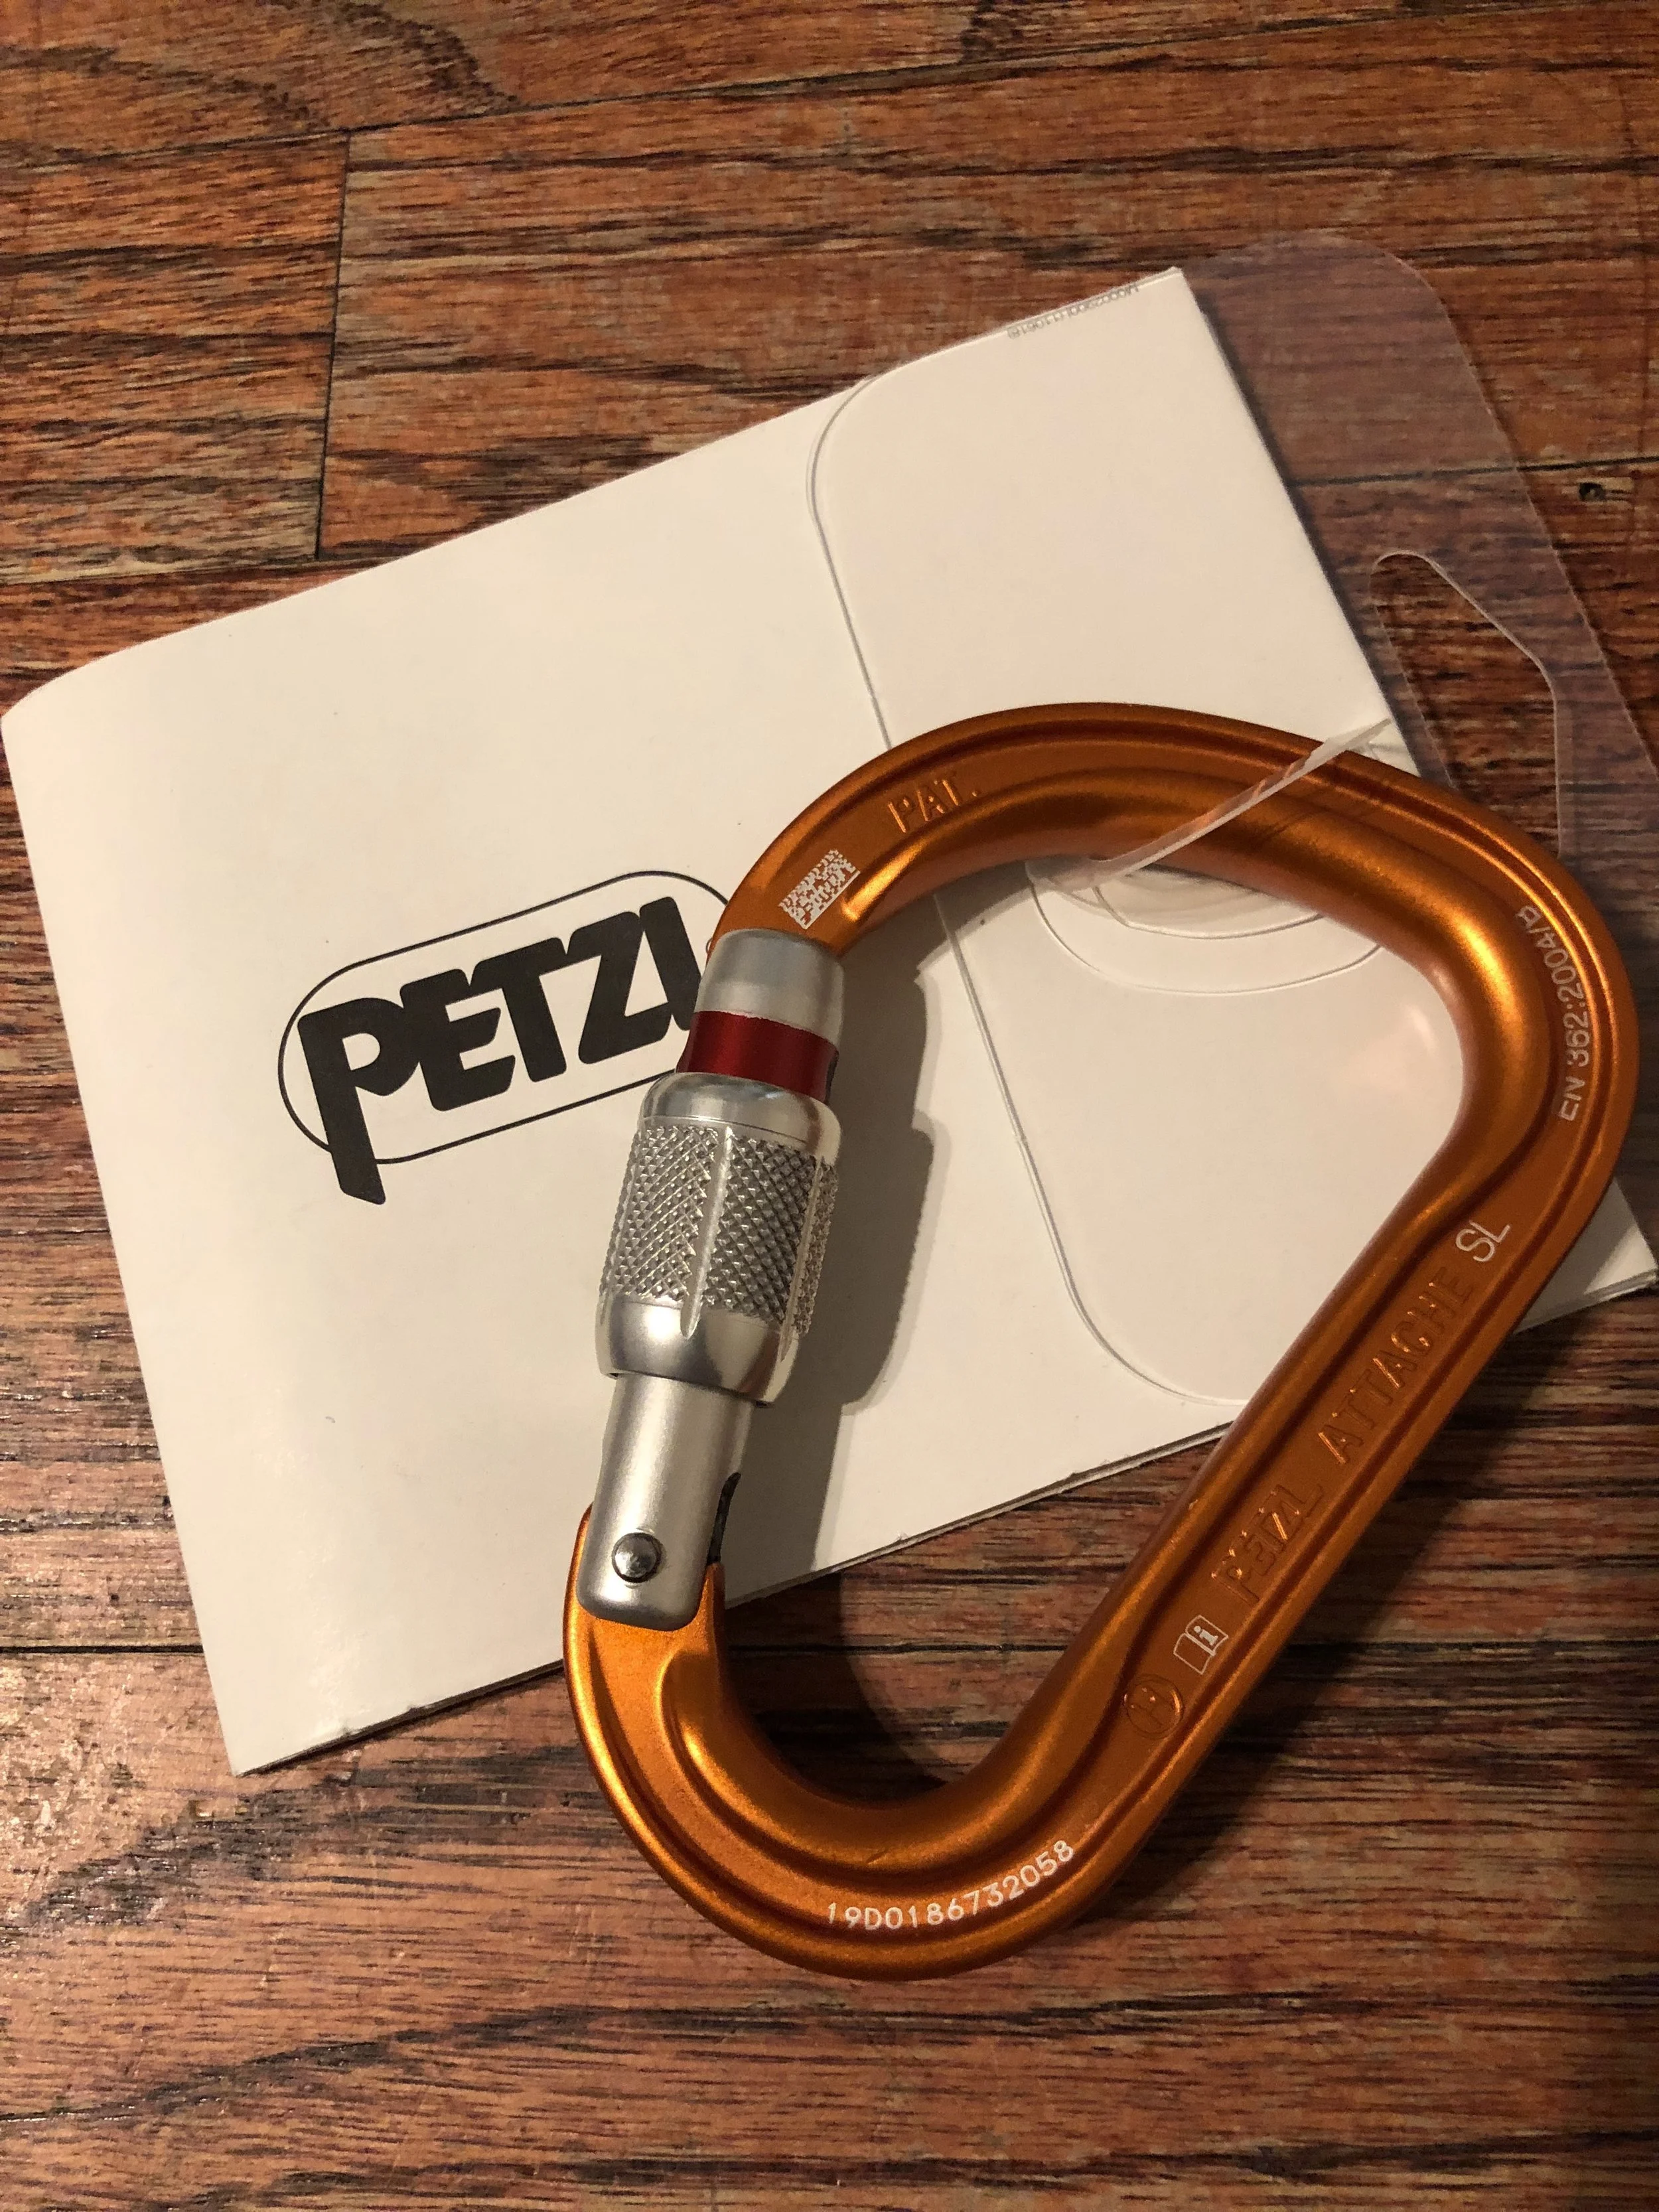
1x Petzl Attache 3D Screw-Lock Carabiner - This is the carabiner I used to attach the runners to my harness. I preferred using this one for that purpose because it locks and it’s easy to tell when it’s locked or unlocked.


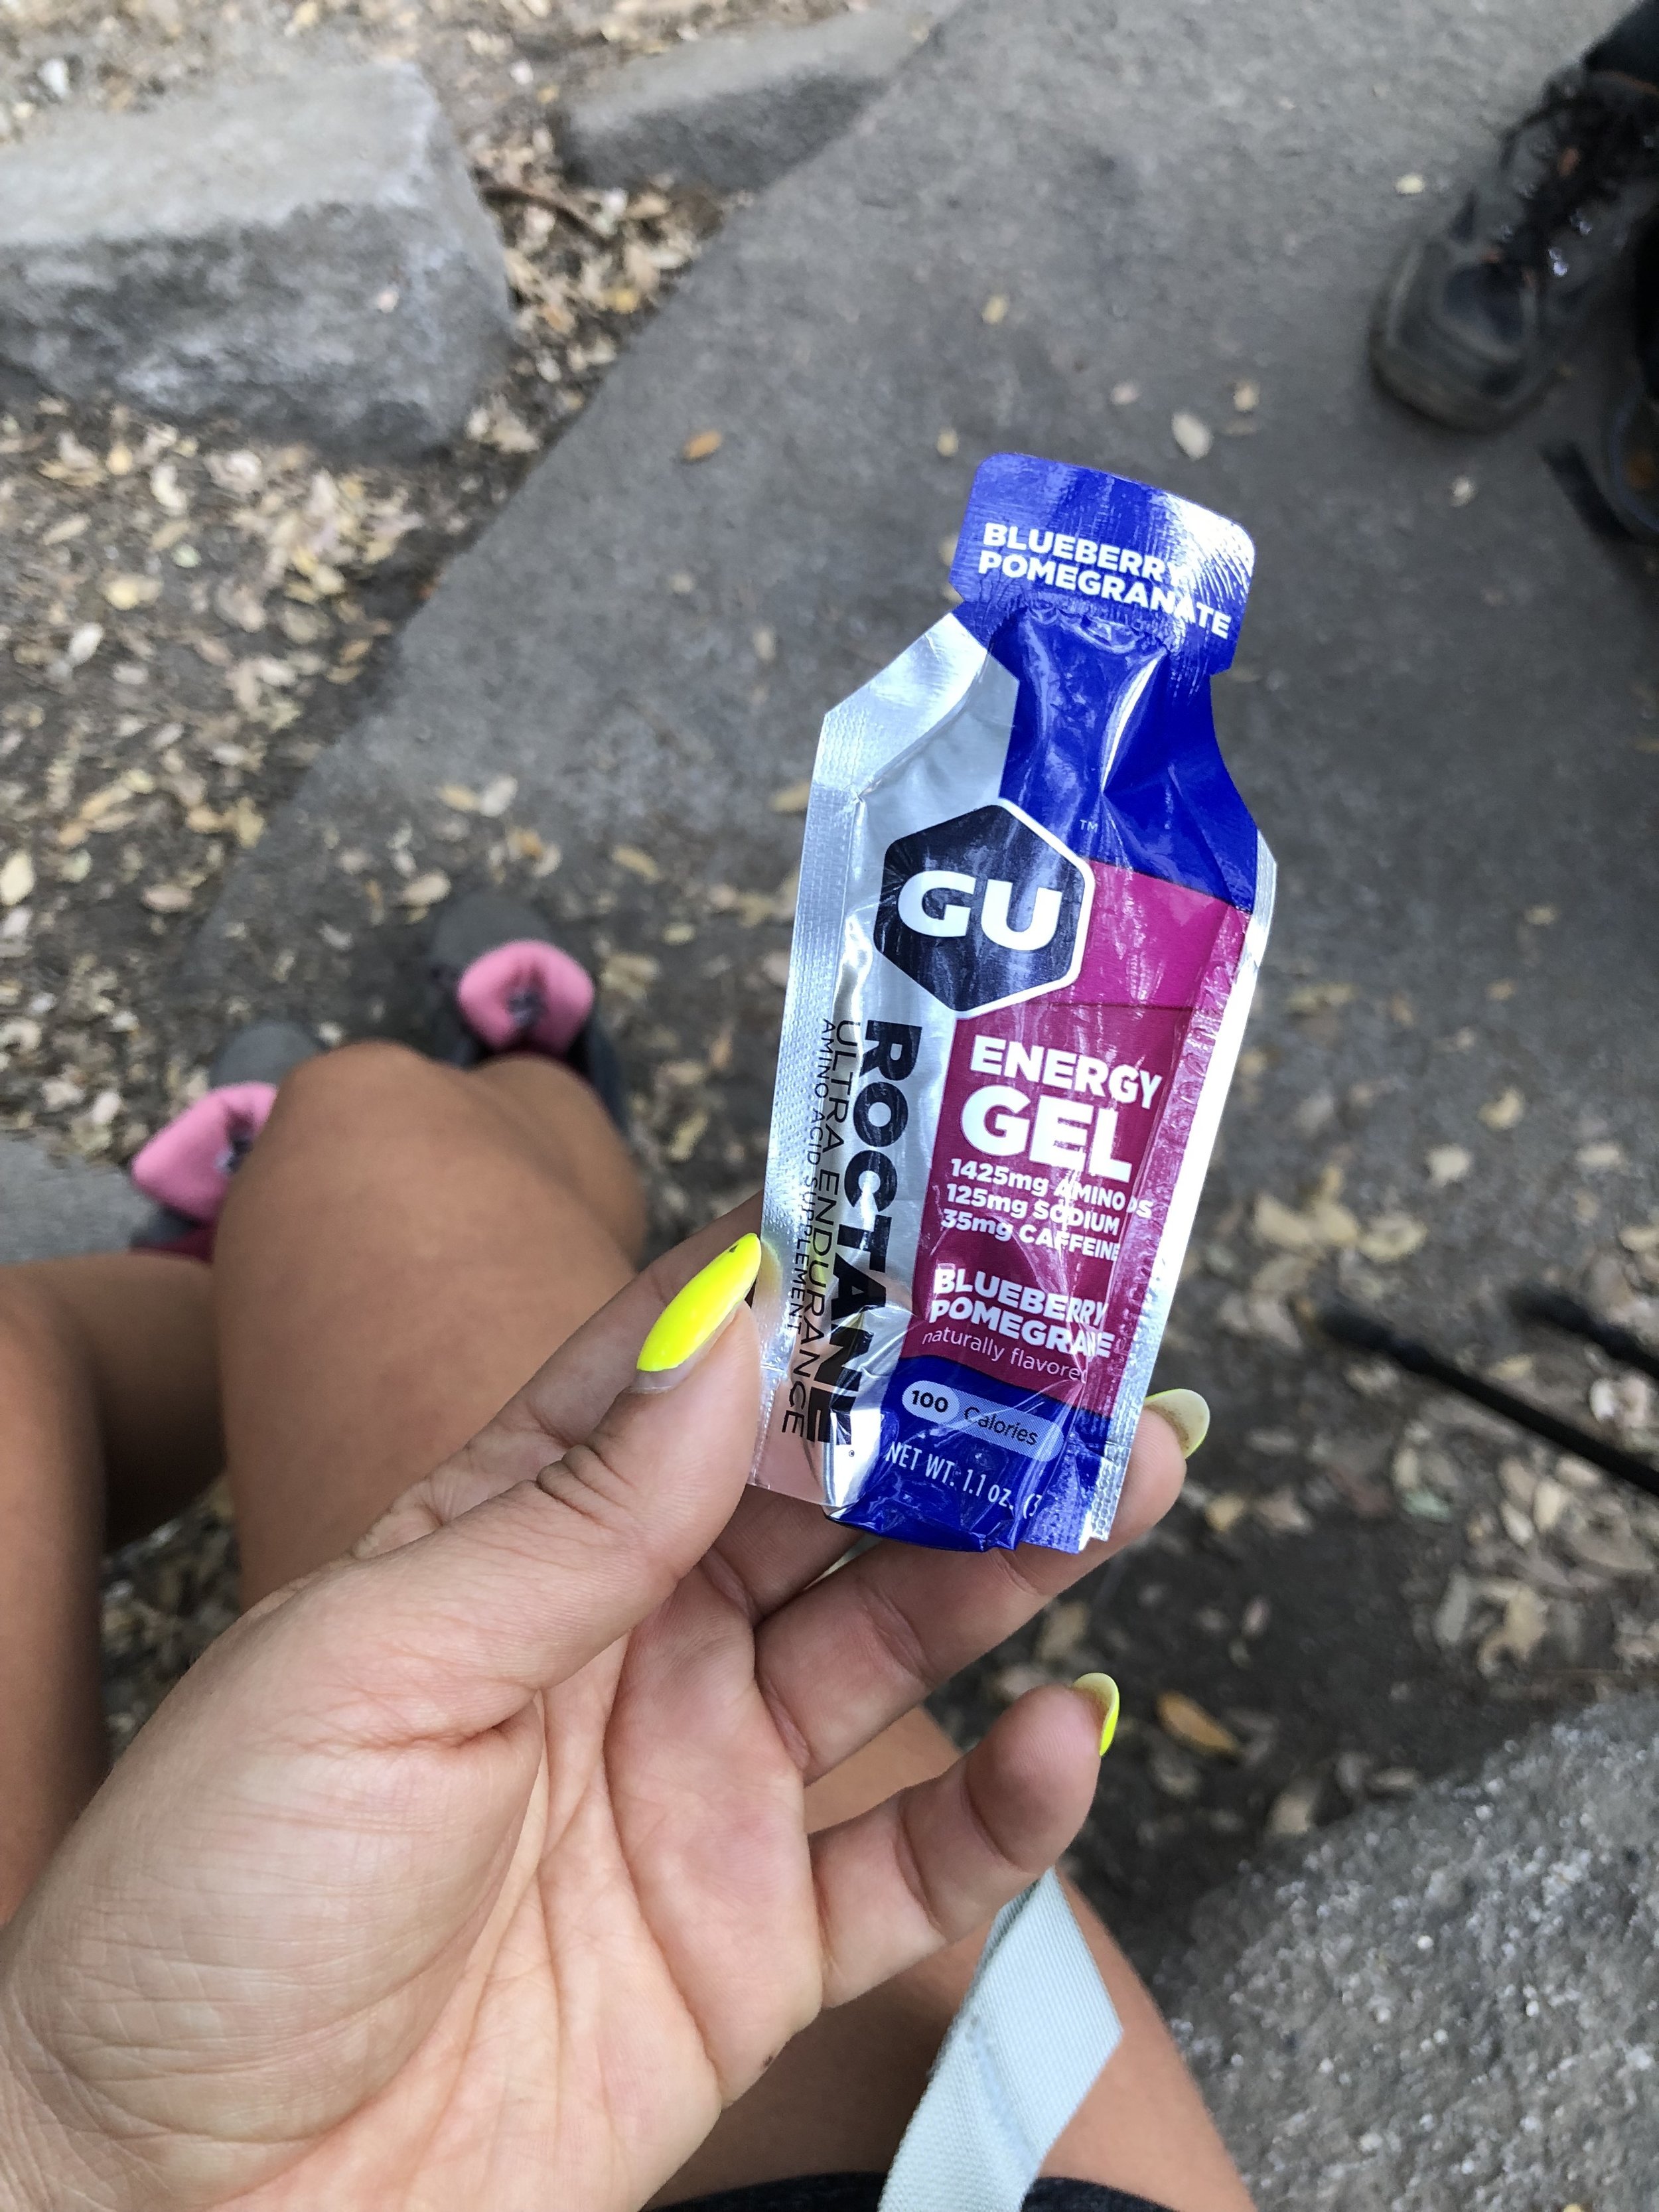
5x GU Roctane Sports Gels - Not picture below, but these things gave me the energy that I needed to complete this hike! Jam packed with amino acids, carbs, & sodium to give you the extra boost on the trail and replenish when you’re burning. I ate one every hour on the way up and one on the way down.
Food - I brought stuff to make sandwiches and separated everything in separate ziplock bags so the bread wouldn’t get soggy. This included bread, turkey meat, cheese, lettuce, onions, tomato, mustard & mayo. I also brought individual bags of chips & paper plates/napkins so we could eat comfortably at the top.
Snacks - We tried to pick out stuff that wouldn’t be too heavy to eat and was healthy but satisfying so we brought protein bars, trail mix, dried mango & bananas.

1 extra 1.5 liter bottle of water - The last thing you want to happen on a hike is dehydration. The gallon of water that I brought between this water bottle and my hydration pack was just enough to sustain me for 11 hours.
First-Aid Kit - Always smart to keep bandaids, Neosporin, & medication on you in case of emergency.
Sunscreen - You can and will get burnt without it.
Flashlight - Especially if you start or end as it’s getting dark! Always good to have in the event that you get lost.

THE CABLES
If you’re anything like me, you want to know every detail about the cables. This was my first and foremost concern about the hike. It was a topic of excitement and anxiety. I watched vlog after vlog of other people doing the climb on YouTube to try to get a sense of just how hard and how high it would be. I actually meant to take a GoPro with me to document this portion of the hike, but of course in all of my excitement I forgot to bring it so this picture and explanation will have to do for now. The final 400 ft. of the hike are spent climbing cables that are held up by metal poles inserted directly into the rock. These cables are only up from late May to early October and it is not recommended to climb the cables when the poles are taken down. You should also come prepared with gloves that have good grip otherwise the steel cables can be very slippery on your hands and will undoubtedly create blisters. Sometimes there is a pile of gloves left at the bottom of the cables by other hikers but I would not rely on this. Bringing your own gloves is the best thing you can do to ensure your own safety. Another precaution to take that is paramount to your safety is to avoid climbing the cables if the weather is not good. If there are ANY rain clouds in the sky, you should avoid the cables and top of Half Dome like the plague. Most fatal incidents that have occurred on the cables have taken place during bad weather. The granite is already very slick and slippery when it’s dry so I can’t imagine how anyone would be able to do it if it was wet. Aside from just rain, lightning is also a huge risk and possibility on Half Dome, even in the summer! That is why most people recommend getting an early start as you have a better chance of avoiding this possibility the earlier you get to the top. Summer clouds and rain usually start to form in the afternoon so the sooner you can get down, the better off you’ll be.

Overall, the cable portion of the hike was not at all as bad as I had feared. I’m not too scared of heights so that part didn’t really bother me, but if you are afraid of heights, this will be a difficult and daunting task for you since you will be thousands of feet above the valley floor. The same way you go up is the same way you come down so you will have to maneuver around others going in the opposite direction as you make your way up and down. Having a harness was the thing that really allowed me to enjoy this portion of the hike without getting crippling anxiety. I highly suggest this for anyone and everyone regardless of your level of fitness just to have some peace of mind. From a physical standpoint, the climb was not too hard but does require some upper body strength as you will be using your arms to pull yourself up rather than your legs. The nice thing is that every few feet, there is a wooden plank that you can use as a place to stand for a few minutes and rest before continuing on. Everyone I encountered on the cables was patient, supportive, and kind. I think people realize that lives are literally at stake and that this is not an easy thing to do so take your time and embrace the journey. Be respectful of others and you will really savor these final steps to the top.

Me about halfway up the cables contemplating why I torture myself.
GETTING TO YOSEMITE
Getting to Yosemite will really depend on where you’re coming from. Since I live in LA, I drove up there in about 5 1/2 hours. However, regardless of where you’re coming from, you will need a car to get around so if you’re flying in from out of state plan to rent a car or an RV upon arrival. Yosemite is a huge a park and can take hours to get from place to place. Another thing to be mindful of is filling up your tank with gas before you enter the park. I believe there is only 1 gas station inside the park and it is significantly more expensive than the gas stations in the surrounding area. You will not want to leave the park once you are there because there is a $35 national park fee per car every time you enter.

Beautiful views of El Capitan as we drove through Yosemite.
STAYING IN YOSEMITE
One thing I learned the hard way is that reserved campsites in Yosemite are VERY hard to come by, first-come first-served campsites can get competitive AF, and hotels can get expensive. So here is the good, bad, & ugly of your accommodation options in a national park that sees about 4 million visitors each year:
Reserved Campsites:
There are 3 campsites in Yosemite Valley (closest to most of the stuff you’ll want to see/do but also the most busy) that you can make a reservation for. These campsites are Upper Pines, Lower Pines, & North Pines. Each campsite can accommodate up to 6 people & 2 vehicles and costs $26 a night. Reservations for these sites open up 5 months in advance at 7am PST and let me tell you, they go FAST. I mean faster than Coachella wristabands. I was on the website about 10 minutes after 7 on the day that reservations opened up for the dates I wanted and they were all already gone. I was shook. What I’ve learned since then is that the best chance you have at getting one of these sites is to have an account already made on the recreation.gov site and be ready to click reserve on the campground that you want as soon as the clock strikes 7. Even a few minutes of lagging can cost you the convenience of having a reserved site. This site lets you know what day you’ll need to be ready to book based on your date of arrival.
First-Come, First-Served Campsites:
This option is for the people that either weren’t able to reserve a campsite or are planning a spontaneous trip and need something at the last minute. There are 7 campsites within Yosemite that are only first-come, first served. The good news is that if you get there early enough (even during peak season), you have a good chance of snagging a site. The bad news is that none of these campsites are centrally located to everything else and will result in a 45min-1.5 hour drive to get to Yosemite Valley with the exception of Camp 4. Camp 4 is the only first-come, first-serve campsite located in the valley and as a result, is highly sought after. This has historically been a very popular campground among climbers which you know if you’ve ever seen “Free Solo”. In previous years, people would start lining up as early as 4 in the morning to try to get a spot here, but this year the park changed this process due to the super long lines and disturbances/fights. Now, there is an online lottery that you can enter the day before your arrival to see if you get lucky. This is now the only way to get a spot at Camp 4.
I stayed at Bridalveil Creek Campground which my group and I really loved because it was just far enough to get away from the swarms of tourists in the Valley but close enough to get there in about 45 minutes which is not bad for Yosemite. We got to the campground around 6am and there were plenty of options to choose from at that time. We picked an empty campsite and staked our claim until the ranger came around at 7am so we could pay for it. This site was only $12 a night but did not have running water/proper bathrooms (not a big deal for us but make sure to do your research ahead of time if this is something you’re not cool with). By mid-morning most of the campsites seemed to have been taken so if you’re going to go this route, make sure to get there early.
Another thing to note is that not all campgrounds are open all year long, most of them are open during the summer and early fall months, but then close from late fall-early spring. See here for more information.
Camping in Little Yosemite Valley:
Little Yosemite Valley is is the most popular area in the Yosemite Wilderness, mainly because it provides easy access to Half Dome. Camping here requires Wilderness Permit for the trails leading to the campground that is separate from the Half Dome permit. These permits are the most difficult to obtain according the the National Park Service Website but iis an ideal option for those who like to go backpacking or don’t want to complete the entire Half Dome hike in 1 day. Little Yosemite Valley is about halfway from Yosemite Valley to Half Dome.
RV Campsites:
Most reserved & first-come, first-served campsites are RV accessible just make sure the campsite you’re interested in has the electric capabilities you’ll need & the space to accommodate the size of your vehicle. You are not allowed to park your RV or car on the side of the road to sleep in Yosemite so a campsite will be mandatory.
Other Accomodations:
There are also a few hotels, cabins, & lodges within Yosemite that you can stay at if camping isn’t really your thing. During peak season, these accommodations can become scarce and expensive but it is an option to consider if you want to enjoy the outdoors without sleeping outdoors.

Campsite #72 at Bridalveil Creek Campground. We LOVED this campsite.